
What Is a Bulb Camera and How Does It Work?
Defining the Bulb Camera and Its Dual Functionality
Bulb cameras combine security monitoring with regular lighting all in one unit that fits right into normal light sockets. These devices don't need complicated wiring like old school security setups do, which makes them great for keeping an eye on things without anyone noticing. About 8 out of 10 people who've looked into home security options really value having both functions in one package since it keeps their yard looking nice instead of cluttered with cameras everywhere. Most models have the camera lens tucked away behind cloudy glass so nobody can see it from outside. They record decent quality 1080p footage while still providing enough light to read by or just keep areas well lit at night.
How Bulb Cameras Differ From Traditional CCTV and IP Cameras
Bulb cameras don't need any drilling work or hiring pros for setup since they just plug into regular electrical outlets that are already there. On the flip side, traditional CCTV setups usually involve running special wires everywhere plus mounting big boxes on walls which can leave areas completely uncovered. Most IP camera models still depend on those annoying Ethernet cords or extra Wi Fi boosters around the house. Bulb cameras have little internal antennas though, so they hook right up to home routers without all that hassle. That's probably why folks living in houses are adopting these bulb style cameras about 42 percent quicker than businesses upgrading their old security systems.
Key Components: Camera, Lighting, Wi-Fi, and Motion Sensors
Four core elements define performance:
- Imaging: Wide-angle lenses (110–150° field of view) with night vision up to 30 ft
- Illumination: Adjustable LED brightness (300–800 lumens) controlled via app
- Connectivity: 2.4 GHz Wi-Fi modules for remote access and real-time alerts
- Sensing: Passive infrared (PIR) motion detectors with customizable sensitivity
These components allow the camera to trigger recording when motion disrupts ambient infrared patterns, sending app notifications and adjusting light output to deter intruders.
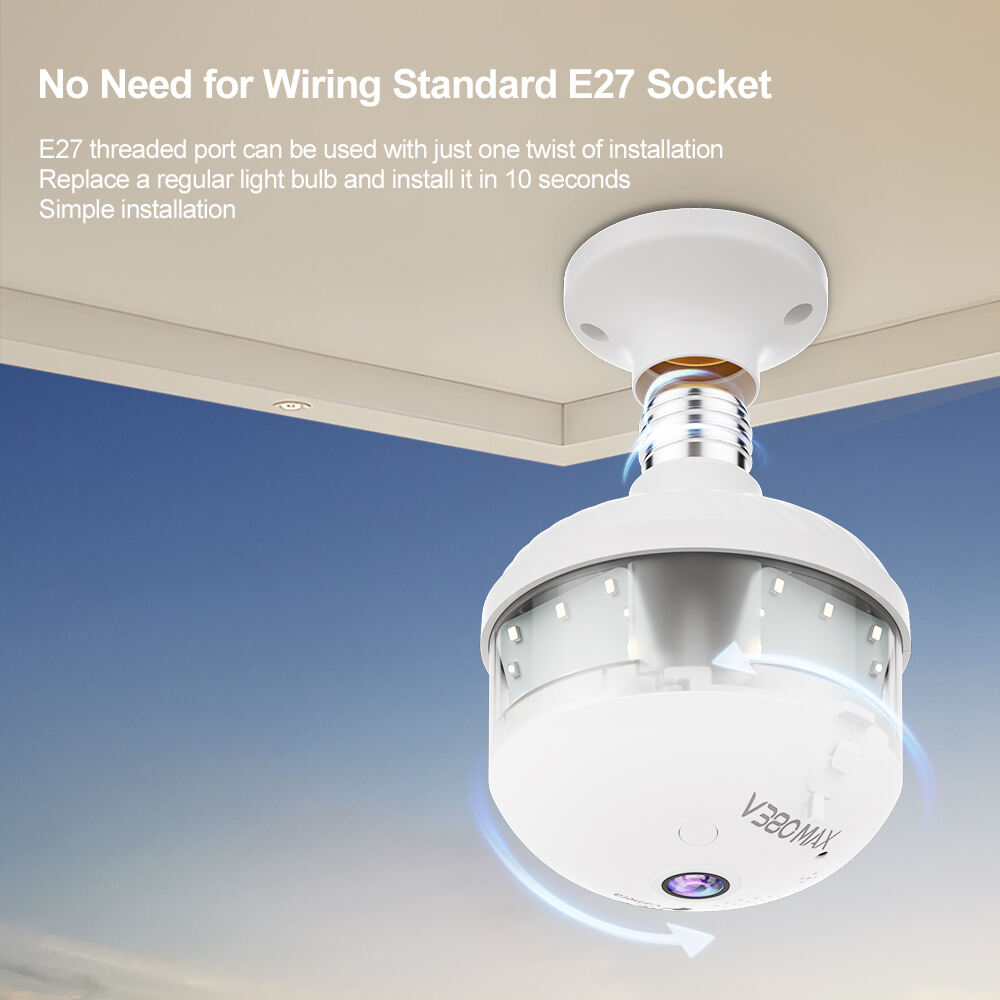
Step-by-Step Guide to Installing a Bulb Camera Yourself
Tools and Safety Precautions: Turning Off Power and Handling Fixtures
Begin by gathering a voltage tester, insulated screwdriver, and sturdy ladder. Always turn off power at the circuit breaker—27% of DIY electrical injuries occur during improper shutdowns (Electrical Safety Foundation 2022). Verify socket compatibility (E26/E27) and confirm your Wi-Fi supports 2.4 GHz connectivity.
Step-by-Step Process From Unboxing to Screwing in the Bulb Camera
Unbox the device and remove protective films. Position your ladder securely, then screw the bulb camera clockwise into the socket until snug—overtightening cracks 1 in 15 fixtures (Home Improvement Safety Council 2023). Adjust the camera angle to cover entry points or high-traffic zones.
Connecting the Bulb Camera to Your Smartphone App
Download the manufacturer’s app, enable Bluetooth, and scan the QR code printed on the bulb base. For weaker Wi-Fi signals, consider a mesh extender; 62% of setup failures stem from poor network strength (2023 Smart Home Connectivity Report). Test night vision and motion alerts before finalizing placement.
Common Installation Mistakes and How to Avoid Them
- Mismatched socket sizes: Verify base type (E26/E27) before purchase.
- Ignoring firmware updates: Outdated software caused 41% of security breaches (Cybersecurity Ventures 2024).
- Direct sunlight exposure: Glare reduces image clarity—opt for shaded or north-facing mounts.
From Screw-In to Sync: Full Walkthrough of Setup and Activation
After securing the bulb, launch the app and follow voice-guided pairing instructions. Enable geofencing to automate recording schedules and reduce false alarms. Most models activate within 90 seconds—if sync fails, power-cycle the device and router.
Choosing the Right Location and Light Socket for Optimal Performance
Factors Influencing Optimal Placement: Coverage, Lighting, and Discretion
Getting the positioning right means finding that sweet spot between what needs watching and the surrounding environment. Look for spots that give almost full circle coverage around busy spots such as door entries but still stay out of sight from passersby. The lighting around these areas matters too when it comes to night vision capabilities which generally work best within about 15 to 30 feet. Glare issues or shadowy patches can ruin footage quality if not properly addressed. According to recent research published last year on home security systems, mounting cameras between nine and twelve feet off the ground actually cut down those pesky blind spots by roughly forty percent over installations at lower heights. Makes sense really since higher placement gives better vantage points without being too obvious either.
E26 vs. E27 Sockets and Voltage Compatibility Explained
| Feature | E26 Socket | E27 Socket |
|---|---|---|
| Region | North America | Europe, Asia |
| Voltage | 120V | 220–240V |
| Thread Depth | 26mm | 27mm |
| Common Uses | Table lamps, ceilings | Pendants, chandeliers |
E26 sockets dominate 85% of North American homes. Always verify your fixture’s voltage rating—using 120V bulbs in 240V E27 sockets risks overheating.
Indoor vs. Outdoor Installation: Weatherproofing and Socket Protection
Outdoor installations demand IP65-rated or higher housings to withstand rain and dust. For soffit or porch placements, add a silicone socket seal to prevent moisture ingress. Indoor setups in lampshades should maintain 2" clearance around the bulb camera to prevent heat buildup exceeding 104°F (40°C).
Ensuring Stable Wi-Fi Signal Through Strategic Placement
Position bulb cameras within 15 feet of your router or use Wi-Fi extenders in dead zones. Avoid thick masonry walls—a 2023 connectivity study showed signal strength drops 60% through concrete versus 25% through drywall. Angle antennas toward the camera and prioritize 2.4 GHz channels with less interference from devices like microwaves.
Connecting Your Bulb Camera to Wi-Fi and Troubleshooting Issues
Why bulb cameras require 2.4 GHz Wi-Fi and aren't compatible with 5 GHz
Most bulb cameras work best with 2.4 GHz Wi-Fi because they can reach further distances and penetrate walls better than the 5 GHz alternative. According to research from last year, around three out of four smart home gadgets struggle keeping a good connection on 5 GHz when placed more than fifteen feet away. Sure, 5 GHz does deliver quicker data transfer rates, but those signals don't handle obstacles so well. The shorter waves get blocked by walls and ceilings pretty easily. That's actually a big problem for these camera bulbs since people usually install them high up in ceiling lights where signal strength matters most.
Step-by-step guide to connecting your bulb camera to the network
- Open your bulb camera’s app and navigate to the device pairing menu
- Ensure your smartphone is connected to the 2.4 GHz Wi-Fi network
- Scan the QR code on the camera housing using your phone’s camera
- Enter your Wi-Fi password when prompted (case-sensitive)
Avoid common mistakes like using special characters in passwords or placing the router more than 30 feet away during setup.
Troubleshooting connectivity issues and boosting signal strength
If connectivity drops occur:
- Relocate your router closer to the camera (ideal signal strength: ⥠-67 dBm)
- Use a Wi-Fi extender to bridge signal gaps
- Limit connected devices on the 2.4 GHz band during initial setup
The FCC reports (2023) that 62% of smart home connectivity issues resolve after adjusting router channel settings to avoid interference from neighboring networks.
Industry Paradox: High-tech features vs. basic network requirements
Even though many bulb cameras now offer features like 4K streaming and AI powered motion detection, they generally don't support 5GHz networks. This is actually a calculated decision made by manufacturers who want to keep prices reasonable around $20 to $50 while making sure these devices work for most people. The reason? A lot of households are still running older equipment. According to that recent Gartner report from 2023, roughly one third of homes have routers dating back to between 2015 and 2018. What does this mean in practice? Well, it puts the security camera market in an interesting spot where cutting edge technology has to play nicely with network standards that aren't exactly brand new anymore.
Maintaining and Maximizing the Lifespan of Your Bulb Camera
Updating Firmware and Securing Your Device From Cyber Threats
Keeping firmware updated regularly helps stop security holes before they become problems. The numbers back this up too – according to Ponemon Institute research from last year, nearly two thirds of all IoT device break-ins happened because people didn't update their software. While most smart bulb cameras do get automatic security fixes pushed out by manufacturers, it's still worth taking five minutes each month to check for updates manually. This extra step catches those new threats that haven't made it into automated systems yet. And don't forget to turn on two factor authentication wherever possible. Hackers love exploiting default login info like "admin" which is still shockingly common across many devices. A simple password change goes a long way toward keeping unwanted visitors out of our digital lives.
Best Practices for Long-Term Usage and Performance
To keep the camera lens clear of dust, give it a quick wipe with a microfiber cloth about once a month. Also worth mentioning is trimming back any plants growing too close that might block the view. Don't put these devices in places where they'll be subjected to really hot or damp conditions either. The internal parts start to break down when temps stay over around 104 degrees Fahrenheit for long periods. For extra protection against power surges, always plug into an outlet with built-in surge protection. And check that Wi-Fi connection regularly too. Most systems work best when the router signal is strong enough, generally somewhere above that -67 dBm mark on the meter.
Future Trends: AI Integration and Self-Diagnosing Bulb Cameras
New AI systems are starting to figure out when maintenance is needed by looking at how things get used. For instance, they might tell someone their camera lens needs adjusting or that batteries should be swapped out. Some smart models can even fix themselves in ways we wouldn't expect. They download updates automatically or change security settings when something looks fishy on the network. According to IoT Analytics data from last year, this kind of automation cuts down on human monitoring work by around 40%. What does all this mean for regular folks? Well, those little bulb shaped cameras we stick outside our homes aren't just sitting there anymore. Instead of waiting for problems to happen, they start acting like watchful protectors that actually do something before trouble arrives.
Frequently Asked Questions
What is a bulb camera?
A bulb camera is a security device that combines a traditional light bulb with a built-in camera, fitting seamlessly into standard light sockets to monitor areas discreetly.
How do bulb cameras connect to Wi-Fi?
Bulb cameras typically connect to a 2.4 GHz Wi-Fi network using a manufacturer's app. Users need to scan a QR code on the camera and ensure their router is compatible with the required frequency.
Can I install a bulb camera outdoors?
Yes, you can install a bulb camera outdoors if it has a durable, weather-resistant housing and is installed in a location protected from direct exposure to the elements.
Are bulb cameras compatible with 5 GHz Wi-Fi networks?
Most bulb cameras do not support 5 GHz networks due to their shorter range and poorer performance through walls compared to 2.4 GHz networks.
Table of Contents
- What Is a Bulb Camera and How Does It Work?
-
Step-by-Step Guide to Installing a Bulb Camera Yourself
- Tools and Safety Precautions: Turning Off Power and Handling Fixtures
- Step-by-Step Process From Unboxing to Screwing in the Bulb Camera
- Connecting the Bulb Camera to Your Smartphone App
- Common Installation Mistakes and How to Avoid Them
- From Screw-In to Sync: Full Walkthrough of Setup and Activation
- Choosing the Right Location and Light Socket for Optimal Performance
- Connecting Your Bulb Camera to Wi-Fi and Troubleshooting Issues
- Maintaining and Maximizing the Lifespan of Your Bulb Camera
- Frequently Asked Questions